mwl-logo

Made With Lau

Recipes

Our Family

Courses

Cookbook Newsletter

mwl-logo

Made With Lau

南乳炸五花肉

The Fried Pork Belly My Dad's Made 100,000 Times

Passing down my dad's (James Beard Award-winning) secrets from 50+ years of making Fried Pork Belly.

Why should you try my dad's recipe?

Recipe main image

Because my dad's made this dish thousands of times (literally!) over his 50+ year career as a Chinese chef. And now, you get to learn all of his tips and techniques.

I know you'll love it as much as our community does - this recipe video has over 614.4K views and 8.5K likes on YouTube!

Love from our community

@klaush.6662

I was Thinking, by making all those good recepiese You and Your dad , this format, will be watched long afterbYou both have moved on to sky country. You got a good formula on hand. Your Cooperation will be appreciated even Your dad run out of Ideas. Love rwatching your bond with Your Dad. Klaus. a. Vancouverite

@Zaxbox

I'm saving this video. Even though I don't deep fry anything I do have a wok and I would give this method a try. I buy the Costco pork belly occasionally and I usually air fry the pieces. Apparently my pieces are too think according to this video because they seem to turn into little meat knobs. I tried baking them and it was not good at all because of the meat cooks faster than the fat. But my air fryer never really gets that nice crunchy skin on it either. Sort of, meh. So I'll keep this in mind for the next time. I will need to pick up a few ingredients from the local H-Mart but they should be easy enough to find. Thanks you for the video. They are really great!

@idontwantahandle._.

Made it halved last night. It was good and solid. Cooked up nice and had a strong red bean taste. Definitely a future recipe. I call it an appetizer because I don't think I would want to eat a lot of it.

Watch on YouTube

Meet your chef, Daddy Lau

50+ Years of Experience

50+ Years of Experience

My dad's been cooking Chinese food for over 50+ years, as a chef, restaurant owner, and loving father.

Meet our family

2x James Beard Awards

2x James Beard Awards

We won TWO James Beard Awards for our endeavors in teaching and preserving Cantonese cuisine.

Read more

Over 2.5M+ Followers

Over 2.5M+ Followers

My dad is the internet's favorite Chinese chef, teaching millions of people how to cook every month.

Watch our videos

Fried Pork Belly (南乳炸五花肉)

Fried Pork Belly (南乳炸五花肉) main image

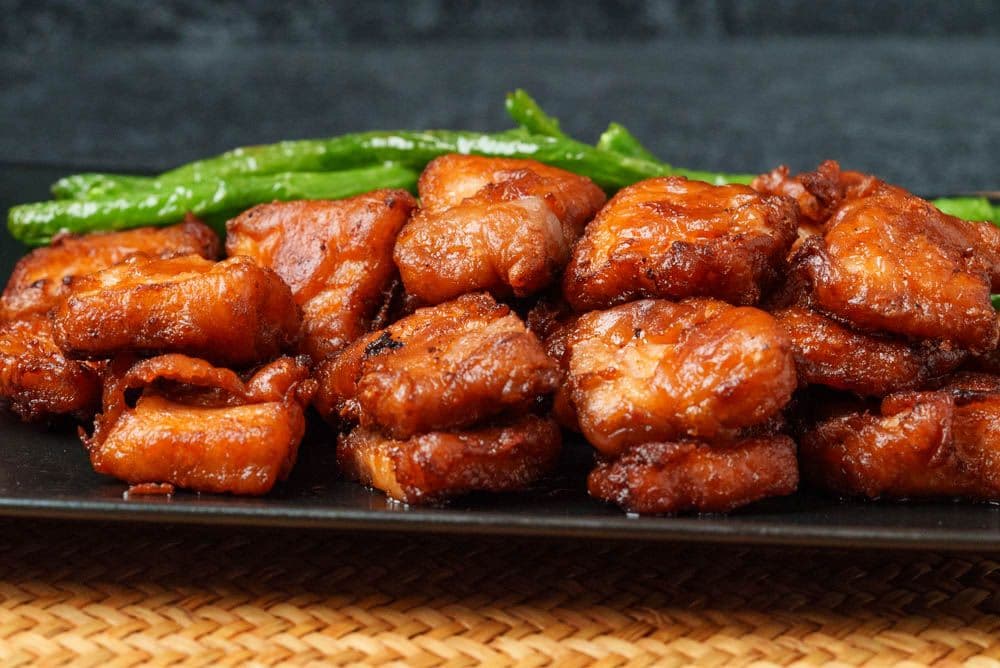
Fried Pork Belly with Red Fermented Bean Curd (南乳炸五花肉) is a quintessential Hakka-style dish. With a super crispy texture and irresistible flavor, this Chinese pork belly is one of the best pork dishes you'll ever make.

Today, my dad will share his crispy pork belly recipe, along with all the tips and tricks he's developed over the years. It's a fast and easy dish you can quickly whip up on a weeknight meal or for a special ocassion.

An expert chef's tip for the crispiest pork belly

Just like in our Salt and Pepper Squid, Fried Chicken Wings and other fried dishes, Daddy Lau's pork belly recipe calls for using a technique called double frying. Frying the pork twice not only gives it a crispiest crust, but also helps keep the meat juicy and tender.

The double fry method, called 返炸 (faan zaa) in Cantonese, helps expel moisture to maximize crunchiness. It's usually done at a higher temperature than the first fry and for less time — in the case of pork belly, just 30 seconds!

Ingredients

Prep

10 minutes

Total

20 minutes

Share

Use our magic wand to update this recipe!

4

Marinade Ingredients

  • 2 oz red fermented bean curd
  • 2 teaspoon sugar
  • 2 teaspoon oyster sauce
  • 0.25 teaspoon white pepper

Main Ingredients

  • 14 oz pork belly
  • 8 oz corn oil (up to 10 oz may be needed)
  • 3 oz green bean (cleaned and trimmed)

Batter Ingredients

  • 3 tablespoon cornstarch
  • 3 tablespoon flour
  • 0.50 teaspoon baking powder
  • 5 tablespoon water

Want a deeper dive into how to craft traditional, authentic Cantonese flavors?

Understanding Flavor

Learn how to recreate the Cantonese flavors you love by demystifying and mastering a handful of core, traditional ingredients

On red fermented bean curd

If red fermented bean curd (南乳 naam jyu) sounds familiar, that's because it's been used in previous Made With Lau recipes! The ingredient is essential to my dad's Char Siu and Buddha's Delight.

As its name suggests, red fermented bean curd is made from tofu that's been preserved in red yeast rice, which gives it the distinct amber color and a strong umami flavor. It has a curd-like texture that has earned it the occasional nickname of "Chinese cheese." Jars are available at most Chinese supermarkets and also online:

  • Wangzhihe Fermented Traditional Bean Curd

On pork belly

For this dish, my dad recommends selecting a thicker piece of pork belly with clear alternating strips of fat and meat. Avoid choosing one that's too fatty.

Instructions

Prep

10 minutes

Total

20 minutes

Share

Use our magic wand to update
this recipe!

4

Help Shape Our Cookbook!

We're writing a cookbook! It won't be available until 2027, but sign up now to get weekly tips and videos from our cookbook development.

Step 1: Prep pork

Cut the pork belly (14 oz) into 1/2-inch thick slices. Place the sliced pork belly into the marinade bowl and mix to thoroughly cover. Set aside

Step 2: Prep marinade

In a medium bowl, combine the red fermented bean curd (2 oz), sugar (2 teaspoon), oyster sauce (2 teaspoon) and white pepper (0.25 teaspoon). Mix together with a spoon.

Chef's Tip: For a deeper color, add some additional liquid from the red fermented bean curd to the mixture.

Add the pork to the marinade mixture and mix to combine.

Step 3: Prep batter

In a small bowl, combine the cornstarch (3 tablespoon), flour (3 tablespoon), baking powder (0.50 teaspoon) and water (5 tablespoon). Stir until there are no more visible clumps.

Chef's Tip: When adding the water to the batter, it's best to start with a bit of the liquid and add more as needed.

Step 4: Cook pork belly

Heat a wok on high heat. While the wok is heating, add half of the batter to the marinated pork belly and use a spoon to mix and coat the pieces.

Once the wok is hot, add the corn oil (8 oz). Continue to heat the wok until the oil temperature reaches 350°F. You can check the temperature using a thermometer or use my dad's chopstick test. Simply place a wooden chopstick into the wok. If it bubbles, then it's time to fry!

Lower the heat to medium. Fry the green beans (3 oz) for 1 minute. Remove the beans using a spider and set aside to drain.

Add the pork belly to the wok one slice at a time, making sure not to crowd the wok. Cook in batches if needed. Fry the pork belly for 1 to 2 minutes, moving the pieces around with a pair of chopsticks to prevent sticking. Lower the heat if the pork cooks to quickly or starts to burn. Remove the pork belly and set aside. Repeat until all of the pork has been fried.

Heat the oil in the wok to 375°F. Fry the pork in batches for 30 seconds, repeating until all of the meat has been double fried.

To plate, place the slices of pork belly on a serving platter with the green beans on the side.

CCC Banner BG

Master Cantonese cooking from the ground up

Develop the intuition and foundation to cook Cantonese food with exclusive classes from a master chef.

Explore all masterclasses

Frequently Asked Questions

Enjoy!

We have many, many happy memories of enjoying this dish growing up.

Now, hopefully, you can create your own memories with this dish with your loved ones.

Also, I cordially invite you to eat with us and learn more about the dish, Chinese culture, and my family.

Cheers, and thanks for cooking with us!

Feel free to comment below if you have any questions about the recipe.

More Recipes


Chow Mein, with Instant Noodles (泡麵版炒麵)

泡麵版炒麵

Chow Mein, with Instant Noodles

Universal Stir Fry Sauce (萬用炒醬)

萬用炒醬

Universal Stir Fry Sauce

Beef Fried Rice (牛肉炒飯)

牛肉炒飯

Beef Fried Rice

Easy Chicken Broth (雞湯)

雞湯

Easy Chicken Broth

Made with love ❤️

The Lau Family

We started Made With Lau to celebrate Cantonese culture and honor the legacy of our wonderful parents, Jenny and Chung Sun Lau.

Our hope is that these recipes and stories help you spread the joy, love, and nostalgia that I felt growing up.

Getting started

As seen in..

FoodNetworkLogo
NYT
CNN
NPR

Made With Lau

Our Family

Privacy

Contact

Our Content

All Recipes

Courses

Check out our Mini Masterclasses

Get Social


Made with in the Bay
Made With Lau © 2025 | Year of the Snake